Sunday, February 1, 2015

Goat Cheese Bruschetta

This has become one of our favorite appetizers.  I can't even begin to describe in words how amazingly, wonderfully delicious this is.  The creamy goat cheese, the perfect balance of balsamic vinegar with the salty capers....perfection.  I've been trying to find reasons to make this.  Maybe we need to host another party....
 
Nah, then I'd have to share!
 
Goat Cheese Bruschetta
 

Ingredients:
1 loaf of French bread cut into 1/2 inch slices
1 lb tomatoes
1 jar capers, drained
2-4 cloves garlic, minced
1 tsp dried basil
1 tbsp balsamic vinegar
2 tbsp olive oil, divided
2 large garlic cloves, halved
4 oz goat cheese, room temperature
1/2 cup shredded Parmesan cheese

1.  Seed and chop the tomatoes.  In a large bowl mix the tomatoes, capers, basil, minced garlic, balsamic vinegar and 1 tbsp olive oil.  Cover and set aside.

2.  Preheat the oven to 425.  Place the sliced bread on a large cookie sheet and drizzle the slices with the remaining olive oil.  Bake until just beginning to toast; approximately 5-8 minutes.
 

3.  Remove the bread and while still warm, rub with a piece of garlic, cut side down.  Spread 1-2 tsp of goat cheese on each slice of bread.  Top with a spoonful of the marinated topping and sprinkle with Parmesan.


4.  Place bruschetta back into the oven just until the Parmesan begins to melt; about 5 minutes.  Serve immediately and enjoy!


Processed Free February

My hubby and I have decided to make a change in the way we eat for the month of February.  We're cutting out anything processed - nothing from a can, jar, bag, etc.  we're excited for this change even though it means a lot more kitchen time for me.

Basically, if I can't make it myself, we aren't eating it.

I'm hoping to fill my blog with lots of new recipes as well as revamping some old ones this month.  Anything posted this month will be made from scratch and with lots of love :)

I'll be posting on my other blog along the way with updates if you'd like to follow along.  Looking forward to bettering our eating habits and becoming more healthy along the way!
 
~ Sara :)

Whole Grain Sandwich Bread

I love a good, seedy bread.  This one is perfect.  A soft, whole wheat bread with flax, sunflower and pumpkin seeds throughout.  A great way to add some protein and fiber to your sandwiches.  Even better topped with homemade nut butter!
 
Whole Grain Sandwich Bread
Makes 1 -1 1/2 lb loaf
 
 
Ingredients:
1 1/3 cups warm water
2 tbsp butter, softened
3 tbsp honey (raw local honey if possible)
1 1/2 cups bread flour
1 1/3 cups whole wheat flour
1 tsp salt
1/4 cup flax seeds
1/4 cup pepitas (raw pumpkin seeds)
1/2 cup raw sunflower seeds
1 tsp active dry yeast
 
Directions:
1.  Place all ingredients in your bread machine per its instructions.  Select 1 1/2lb and Basic White cycle.  Allow to cool on a wire rack before slicing.  Enjoy!


Saturday, January 31, 2015

English Muffins


If I would have known how easy it was to make English muffins from scratch, I would have done it a looooong time ago!  Slather them in homemade nut butter, butter, jam, honey or put a fried egg in between!
 
English Muffins
Makes 1-2 dozen
 
 
Ingredients:
1 cup Milk
3 tbsp butter, softened
1 egg
1/2 tsp salt
2 tsp sugar
3 cups all-purpose flour
1 1/2 tsp yeast
1/4-1/3 cup Cornmeal
 
Directions:
1.  Place all ingredients except cornmeal into your bread machine.  Press the dough cycle and let it do the hard work!
2.  Turn the dough out on to a work surface sprinkled with cornmeal.  Sprinkle cornmeal on top of the dough and roll it out to a rectangle; you want the dough approximately 1/2 inch thick.  Cut the dough into circles (I use a biscuit cutter), continuing to re-roll the dough and cut.


3.  Place the muffins on a baking sheet, cover and let rise for 30-40 minutes.  After they have risen, cook them over medium high heat on either a cast iron pan or large skillet.  They will cook for 5-10 minutes per side, depending on their size and thickness.  Place them on a cooling rack and store in the fridge the freezer.  Enjoy!


Monday, January 26, 2015

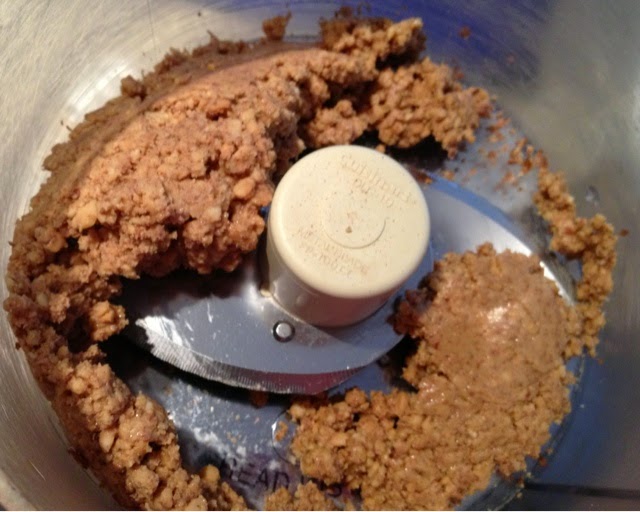
Homemade Nut Butter

I have been making my own nut butters for about six months now.  I'll never go back to buying it at the store!  It is seriously so easy and quick.  All you need is a food processor and 5 minutes.  For real.

 "Peanut. Hazelnut. Cashew nut. Macadamia nut...Pistachio nut. Red pistachio nut. Natural, all natural white pistachio nut."
(name that movie!)

The best part?  You can use any nut that you like.  Your favorite nuts are almonds?  Throw some in a food processor!  One of my favorites is walnut butter.  So creamy, smooth and delicious.  A nice to change to regular ol' peanut butter.  Not that there's anything wrong with peanut butter!

I've experimented with different kinds of peanuts and, surprisingly, the type I've found to work (and taste) the best are roasted, salted, skin on Spanish peanuts.  When I first tried them, I was skeptical because of them having the skin, but they work so well and the outcome is delicious!  Two of my favorite ways to enjoy nut butter is on English Muffins or Whole Grain Sandwich Bread.

Homemade Nut Butter

Walnut and Peanut Butter.  Deeeelicious!
Ingredients:
Nuts


That's it.

Directions:
1.  Place the nuts in a food processor - I usually do about 8 ounces at a time, you don't want a crowded processor.  Turn the processor on and let it run for 2-5 minutes until you have a smooth, buttery consistency.  You may need to stop and scrape down the sides once, but that's it!  How easy is that!?


You can also spice up your butter with anything you like: cinnamon and chocolate are two of my favorite add-ins :)

Monday, December 8, 2014

Sautéed Brussels Sprouts with Cranberries, Walnuts and Gorgonzola

I adore Brussels Sprouts.  No, really, I do!  When I was younger, my mom would boil them and the only way I'd eat them was with tons of butter.  Kinda sorta defeats the purpose, I suppose.  But now I make them all the time, most often roasted.  I made these Brussels sprouts last year for Thanksgiving and they were so good that I made them again for Christmas.  Then....I forgot about them.  Until this week.  These are soooo good.  The kind of thing you don't want to end.  Ever.

Sautéed Brussels Sprouts with Cranberries, Walnuts and Gorgonzola
Serves 2-4

Ingredients:
1 lb Brussels sprouts, trimmed and quartered
1/2 cup walnuts, roughly chopped
2/3 cup fresh cranberries
1/2 tbsp balsamic vinegar
3/4 tbsp maple syrup
2 tsp evoo
1/3 cup Gorgonzola, crumbled
Kosher salt

Directions:
1.  Heat a large skillet over medium high heat.  Add the walnuts and toast until they become fragrant and start to brown.  Do not step away!  They will go from toasty to burnt in seconds.  Transfer to a small bowl and set aside.

2.  Put the pan back on the heat and add the evoo.  Once the oil is hot, add in the Brussels sprouts.  Sauté until they're beginning to brown and starting to get tender; about 8-10 minutes.  Add in cranberries and continue to sauté.

3.  Once cranberries begin to pop and Brussels have reached desired tenderness, add in reserved walnuts and sprinkle with Kosher salt and mix well.
 
4.  Add in the maple syrup and vinegar.  Mix well, sprinkle with Gorgonzola and serve.  Enjoy!!
 

Thursday, September 11, 2014

Garlic Breadsticks

Phew, what a summer!  We've been super busy - we bought a new house!  It's definitely put a damper on my blogging, but hoping that will change as we continue to get settled in our new home.  The good great news!?  I have a much bigger kitchen to cook/bake/experiment in now.  Woo-hoo!!!

Now that fall is right around the corner here in Michigan, the urge to bake and make comfort food is creeping up on me.  Today was rainy, dark and dreary...perfect soup weather.  And, I don't know about y'all, but soup in our house just isn't complete without bread.

I already had everything for my Ravioli Soup so I figured I'd make that.  As for the bread, I wanted something different...garlic breadsticks to be exact!  I love my bread maker because of how simple it is to make a loaf of bread, but sometimes I don't mind using a little elbow grease.  The bread maker still does all the hard work ;)

These were great and the recipe can easily be doubled if need be.  I will definitely be making these again!

Garlic Breadsticks
Makes 10 breadsticks

Ingredients:
1/2 cup plus 1 tbsp warm water
1 tbsp olive oil
1 tbsp granulated sugar
2 tsp garlic powder
3/4 tsp salt
1/3 tsp dried basil
1 cup bread flour
1/2 cup whole wheat flour
1 tsp yeast
2 tsp unsalted butter, melted
2 tbsp grated parmesan cheese

Directions:
1.  Place the water through yeast into your bread maker per its' instructions.  Select the dough cycle and let it do the hard work!

2.  Once the dough has finished, place it on a floured surface.  Divide the dough into ten equal portions and then roll each out into about 6 inch long sticks.  Place on a greased baking sheet.  Cover and let rise for 30-40 minutes.


3.  Once they have finished rising, brush the breadsticks with the melted butter and sprinkle with parmesan cheese.  Bake at 350 for 15-20 minutes, until just beginning to brown.  Enjoy!