Showing posts with label vegetarian dinner. Show all posts

Wednesday, October 28, 2015

Refried Beans

Confession time: this is not my first go at refried beans.  I've tried them before and they were runny, watery, and just, well, gross.

But this time?  This time they were really good.  Like, good enough that I ate them leftover.  Yeah, that's kind of a big deal.

 
They are simply seasoned - just taco seasoning and a little S&P.  Plus, they are very low maintenance too.  They cook for a few hours, but you don't have to do much besides blend them up at the end.  And, depending on how chunky or smooth you like yours, might not take much time at all. 

We had these on tostada shells for dinner - it was a great meal!

Refried Beans
Makes 8 servings


Ingredients:
16 oz dried Pinto beans, rinsed and picked through (remove any 'ugly' beans or stones that may have snuck inside the bag)
1 medium onion, coarsely chopped
2 garlic cloves, smashed
2 tbsp taco seasoning
Water or veggie/chicken/beef stock
1 tbsp butter
Salt and pepper to taste

Directions:
1.  Place the beans, taco seasoning, onions, garlic and enough water (or stock) to cover the beans by about 1 inch and bring to a boil.  Lower the heat to a simmer, cover and cook until the beans are tender - between 2 and 3 hours.  Open the lid to stir every 30 minutes or so and add more liquid if it gets low.

 
2.  Remove the beans from the heat and get to mashing/pureeing!  I used my immersion blender, but a potato masher and some elbow grease would work great too.

 
3.  Once the beans have reached the consistency you like, taste and season with salt and pepper (and more taco seasoning if desired), turn the burner back up to medium and add in the butter.  Stir the beans to melt the butter and warm back up.  Serve and enjoy!


 Happy Eating!
 
~ Sara :)

Tuesday, October 27, 2015

Pierogis

Move over, Mrs. T.!!
 
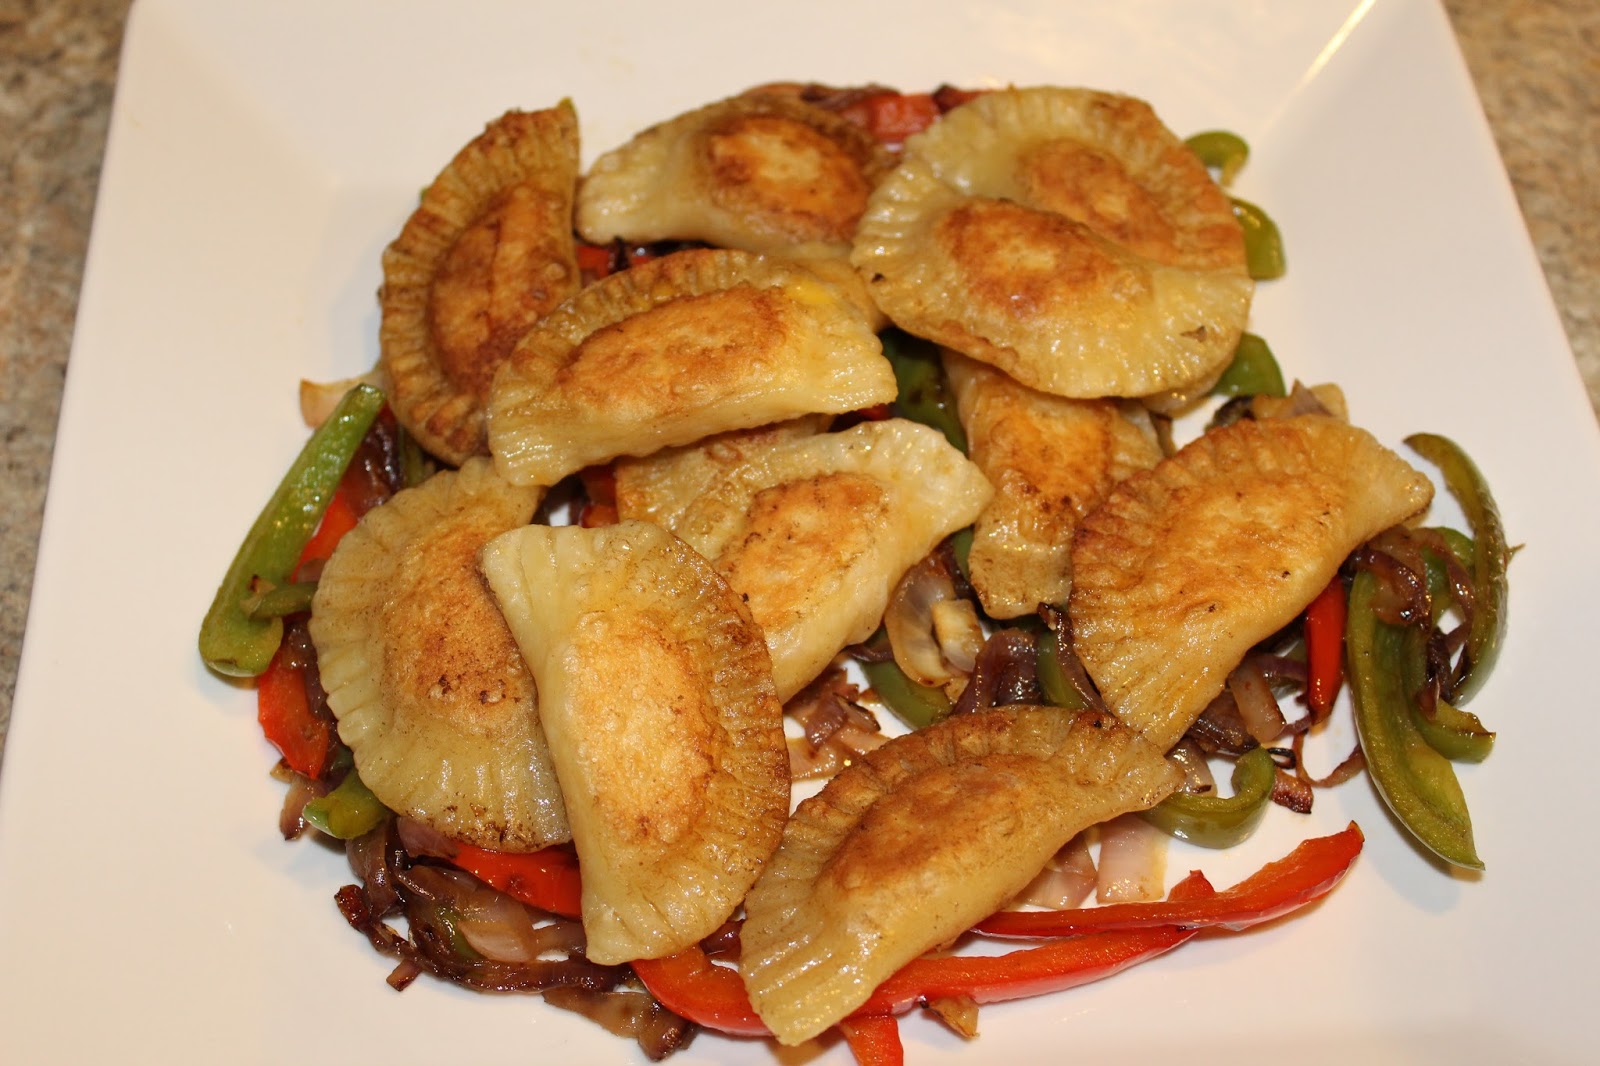
I grew up on frozen pierogis - they're one of the few items that I will still occasionally buy frozen and cook.  But, that may all change now that I've made them from scratch.  These are one of those meals that you never make because you think they'll take too long....but in reality, they don't.
 
Another plus?  You can make a whole lot of them and freeze them.  Just one batch makes a ton.  If you were to double it - well, then you'd be set for many meals!


I tried two different fillings for these - the classic mashed potato and cheddar and some with my fermented sauerkraut.  I was pleasantly surprised with the sauerkraut.  I may have even liked those a bit more than the potato.
 
Sure, these take time, but the nice thing is that you can do a lot of the work ahead of time.  The dough and filling and even the pierogis can be made in advance and cooked when needed.


These are traditionally served with sour cream and/or applesauce.  I like to serve mine with sautéed peppers, onions and garlic.
 
 
Homemade Pierogis
Makes approx. 4 dozen


Ingredients:
2 cups all-purpose flour
1/2 tsp salt
1 egg, beaten
1/2 cup sour cream
1/4 cup unsalted butter, room temperature
1 cup prepared mashed potatoes combined with 1 cup shredded cheese
Or
1 cup sauerkraut, well drained
2 tbsp olive oil
1 medium onion, sliced thin
1 bell pepper, cut into strips
2 garlic cloves, minced
2 tbsp butter

Directions:

1.  For the Dough: In a large bowl, whisk the flour and salt together.  Add in the egg, sour cream and room temperature butter until the dough forms a slightly sticky ball.  Use your fingertips and knead the dough until it becomes less sticky, but is still moist (no additional flour should be necessary).  Wrap the dough in plastic wrap and refrigerate for at least 30 minutes, but up to 24 hours.


2.  Once the dough has been chilled, remove it from the fridge and cut it in half.  On a well floured surface, roll the dough out to approximately 1/8" thick.  Using a 2"-3" cutter (I used a 2.75" biscuit cutter), cut the dough into circles.  Repeat until all dough (or at least most) has been used.


3.  Fill each dough circle with 1-2 tsp of mashed potato or sauerkraut filling.  Fold the dough over and, using a fork, seal the edges of each pierogi.  Now, these can be cooked immediately, refrigerated for 24 hours or frozen for 2 months.


4.  To prepare:  Heat 2 tbsp of olive oil in a large skillet.  Sauté the peppers and onions until nice and golden, adding in the garlic for the last 2 minutes of sautéing.  While the peppers and onions are sautéing, bring a large pot of salted water to boil.  Boil the pierogis in batches until they float to the top of the water.  Remove, place them on a paper towel to drain and repeat until all pierogis have been boiled.
 

5.  Remove the peppers, onions, and garlic from the pan and place on a serving plate.  Melt 2 tbsp of butter in the pan and nestle the pierogis in the pan.  Cook on each side until golden brown, approximately 3-5 minutes per side.  Serve the pierogis atop the peppers and onions.  Enjoy!


Happy Eating!
 
~ Sara :)

Tuesday, March 25, 2014

Mushroom Tetrazzini

There are a few dishes that I really miss since becoming a vegetarian.  Turkey Tetrazzini is one of them.  So, I decided to make a vegetarian version with just mushrooms.  Just as creamy and delicious as I remember.  Even without the turkey!

Mushroom Tetrazzini
6 servings

Ingredients:
1/4 cup unsalted butter
1/4 cup flour
1/2 tsp salt
1/2 tsp pepper
1 tbsp (2-3 cloves) garlic, minced
1 cup low fat milk
1 cup low sodium vegetable broth
8 oz mushrooms, chopped
8 oz whole wheat pasta, cooked and drained

Directions:
1.  Preheat oven to 350.  Melt butter in a large pot over medium-high heat.  Add in flour, salt, pepper and garlic and whisk until no lumps remain.  Pour in broth and milk and let cook until it begins to bubble and thicken, whisking occasionally.
 
2.  Once sauce has thickened, add in mushrooms and pasta.  Mix well ensuring everything is coated in the sauce.
 
 
3.  Pour tetrazzini into a 2 quart baking dish and top with Parmesan.  Bake until bubbly, 20-30 minutes.  Place dish under the broiler for 1-2 minutes to brown the top.  Let cool for 10 minutes, serve and enjoy!

Sunday, November 10, 2013

Ravioli Soup

This is a delicious, filling, super easy soup that takes no time to throw together.  It's full of healthy veggies, but also has hearty ravioli (tortellini works great too!) to fill your belly.  Use any type of ravioli you like.  The last time I made it I used one filled with asiago cheese and pesto.  Delicious!

Ravioli Soup
Serves 4

Ingredients:
1 red bell pepper, chopped
1 small onion, chopped
2 garlic cloves, minced
4 cups low sodium vegetable broth
26-28 oz chopped tomatoes
2 tsp dried oregano
1 tbsp dried basil
1 pkg (about 1 lb) fresh or frozen ravioli
2-3 cups fresh baby spinach (about 2 large handfuls)
Freshly grated parmesan

Directions:
1.  Combine all ingredients except ravioli, spinach and parmesan into a large pot*.  Bring to a boil, lower heat, cover and simmer for 30 minutes.  Add in the ravioli and spinach and cook for an additional 10 minutes, uncovered, until the ravioli is warmed through.  Serve and top with freshly grated Parmesan cheese.  Enjoy!

*If you prefer your veggies softer, sauté them in a tablespoon of olive oil for 5-10 minutes before adding the broth and tomatoes.

Saturday, August 24, 2013

Eggplant Parmesan

Eggplant Parmesan could quite possibly be my favorite meal.  Crispy eggplant, melted cheese, pasta, what's not to love!?  After many attempts, I have finally figured out how to get a crunchy, crisp exterior without frying.  When I make this for myself, I make Chicken Parmesan for Jason.  

Eggplant Parmesan
Serves 2-4
 
Ingredients:
1 medium eggplant
1 cup Italian Panko
1/3 cup freshly grated Parmesan
1-2 eggs, beaten
1/2 cup marinara sauce
4 oz fresh mozzarella
Kosher salt

Directions:
1.  Cut the eggplant into 1/2 inch slices.  Place the slices on a wire rack and sprinkle each slice with kosher salt.  Allow to sit for at least 30 minutes, flipping halfway and wiping excess moisture off.
 

2.  Preheat oven to 375.  Line a baking sheet with parchment paper and spray the paper with cooking spray.  Combine the breadcrumbs and Parmesan in a shallow dish.  Place the beaten egg in another shallow dish.  Dip the eggplant slices in the egg, dredge in bread crumbs and place on prepared baking sheet.  Bake for 30 minutes, flipping halfway through. 


3.  Once eggplant is crispy and tender, remove from oven.  Place 1 tbsp marinara and mozzarella on each slice of eggplant.  Place under the broiler for 2-4 minutes; until cheese is melted.  Carefully remove from the oven and enjoy!